Oracle BI Repository
Oracle BI Server stores metadata in repositories.
The Oracle BI Administration Tool has a graphical user interface that allows server administrators to set up these repositories. An Oracle BI Server repository consists of three layers. Each layer appears in a separate pane in the Oracle BI Administration Tool user interface and has a tree structure. You can expand each object to see a list of its components. These layers are not visible to the end user.
Creating Repository and Building Physical layer
To build or create a new Repository you should use the Oracle BI Administration Tool first.
By importing metadata from databases and other data sources Physical layer is populate and the data sources can be of the same or different varieties. You can import schemas or portions of schemas from existing data sources.
During the import process many of the properties of the data sources are configured automatically based on the information gathered.
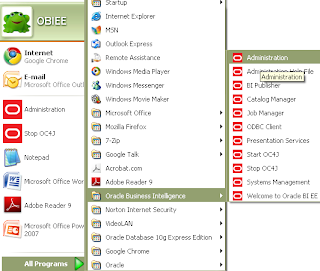
Start Administration Tool
From start menu you can use the Administration Tool

When you save the new repository it opens in Administration Tool window which displays the empty layers Presentation Layer, Business Model & Mapping layer and Physical layer and don’t close it

After this you need to create an ODBC Data Source to import schema information about a data source into an Oracle BI Server repository.
So you need to follow these steps.
Click on start menu
1. Start
3. Control Panel
4. Administrative Tools
5. Data Sources (ODBC) where you can select the data sources
Open the ODBC Data Source Administrator and click on system DSN and then Add button to create new data source.

In the Create New Data Source dialog box, select the Oracle driver Oracle in XE (for oracle Express Edition) and finish it.

Configure the data source in Oracle ODBC Driver Configuration dialog box enter a Data Source Name and select the appropriate TNS Service Name from the drop down list than click Test Connection to open the Oracle ODBC Driver Connect dialog box.

In the Oracle ODBC Driver Connect dialog box enter the user name and password and click OK.
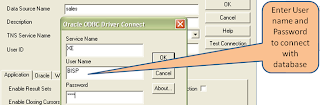
"Testing Connection" message indicating the connection is successful. You need to see the message Connection Successful.

Now it shows your data source which you have chosen Close Oracle ODBC Driver Configuration dialogue box and ODBC Data Source Administrator.

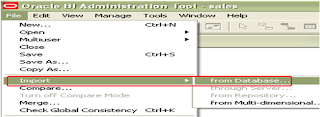
Now you should back on the Administrative tool and click on File choose Import from database to get your data source.
And in select data source dialog box select your data source name and Enter username and password click ok.

So after selecting the data source you will get the import dialog box to select the database/databases and expand it.
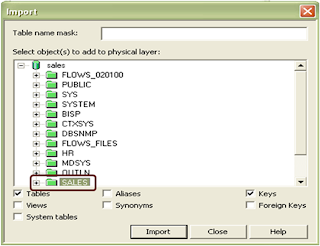
Select the tables with Ctrl + Click and click on the import button. When the Import process completes, click Close to close the Import dialog box.

Physical layer of Repository
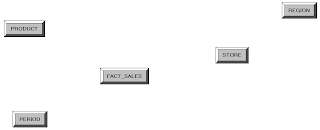
Now the database imported to the physical layer of repository and check that the tables which imported were correct.
To view all objects of the Physical layer expand the database. Which are Database, Connection Pool, Schema Folder, Tables, Columns, and Key Columns etc.
Physical Database Object defines the data source to which Oracle BI Server submits queries. When physical schema imported to physical layer database name and type are automatically assigned.
To view Physical Database General Properties Right click on the table and select properties you can view and set them.
When the schema is imported to the physical layer the Features (SQL Features) table is automatically populated with default values appropriate for the database type. These features that Oracle BI Server uses with this data source.
Physical Database General Properties

and Features

Check Connection Pool Setting
The Connection Pool Settings defines how Oracle BI Server connects to a data source. It contains information about the connection between Oracle BI Server and a data source. It specifies the data source name and allows multiple users to share a pool of data source connections. When you import the physical schema the database object and connection pool are automatically created. For multiple users you can create multiple connection pools to improve its performance and can set after a time duration connection will disconnect. For every database there is one connection pool separately.
It contains information about your DSN (data source name) which is used to connect to a data source, how many connections allowed, timeout information and other administrative details related to connectivity. To share a single database connection it allows multiple concurrent data source queries reducing the overhead of connecting to a database because it never open and close a new connection for every query and if you don’t select this option each query sent to the database opens a new connection.

Schema Folder: - Which contains all the tables inside of a physical schema. It’s created automatically or by default when you first import database or schema from a data source.
If you want to create a new schema object, Right-click the database object and select New Object -> Physical Schema.
Physical Table
It corresponds to a table in a physical data source and imported from a database. Physical Table provides metadata which is necessary for Oracle BI Server to access the tables with SQL requests. Actual data is not moved from physical data source when you import data source definitions.
General Properties of a Physical Table
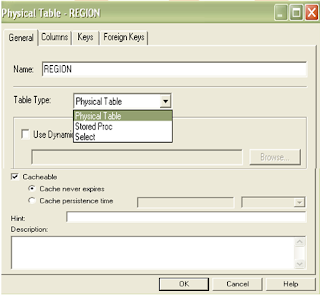
In General tab you can view, edit existing and create columns, keys, foreign keys which are associated with table and set general properties for a physical table you can rename your table name and use select statement also to create views.
You can see all the columns of the table in the Physical Table dialog box when you click on the column tab.

You can see all the key columns of the table in the Physical Table dialog box when you click on the keys tab.

You can see all the foreign key columns of the table in the Physical Table dialog box when you click on the foreign keys tab.

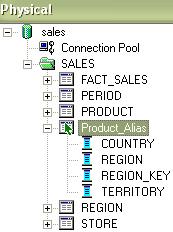
Create Alias Table
To create alias table Right-click on a physical table and select New Object -> Alias.

It is a virtual physical table object that points to a physical table object. An alias table always inherits all the column definitions from the source table and automatically synchronized. You can`t modify (Create, Delete) the alias table its read only, but if you modify source table you will find same changes in alias.
Give a name for the alias table and click ok.


The alias table appear in the physical layer with the alias symbol has green arrow on the table.
Physical Column Property
Right Click on the column and choose properties or double click on the column to view it`s properties and modify. Column properties are set automatically when the column is imported. In the physical layer every physical table has one or more physical columns

Key Columns
Defining Keys Using the Table Properties

Key columns used to defines a one-to-many relationship between two tables. A primary key is defined as a column or set of columns where each value is unique identified by a key icon and identifies a single row of the table. A foreign key is a column or a set of columns in one table that references the primary key columns in another table. Keys and joins help Oracle BI Server determine the fact– dimension relationships between tables. The Physical layer typically uses foreign key joins to define relationships, whereas the Business Model and Mapping layer uses logical joins to define relationships.
Joins in Physical Layer
Joins represent the relationships between tables in the Physical layer. Joins that already exist in the physical data sources are imported automatically into the Physical layer, but you can modify. When you import keys in a physical schema, the primary key–foreign key joins are automatically defined. It`s necessary to define joins that express relationships between tables in the Physical layer of the repository. Use the Physical Diagram feature to create joins between physical table objects. It provides very easier way to define joins.
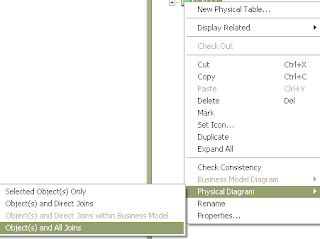
To create joins in physical layer Right Click àPhysical schema àPhysical DiagramàObject(s) and All Joins
In physical diagram rearrange the tables so they are all visible in the Physical Diagram.
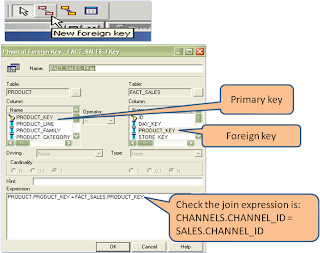
Click the New Foreign Key button on the toolbar Click the Product table and then the FACT_SALES table. The Physical Foreign Key dialog box opens. Continue to create the joins.

Click OK to close the Physical Foreign Key dialog box. The join between Product and FACT_SALES is displayed in the Physical Diagram.
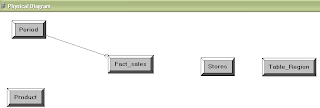
It matters which table you click first the join is creating a one-to-many (1: N) relationship that joins the key column in the first table to a foreign key column in the second table. The Administration Tool automatically determines which columns should be included in the join.This is Physical Diagram of Schema Fact_Sales

Check that relationship between dimension table and FACT table is always one-to-many (1: N). And check that more than one fact tables are not in the physical layer. This diagram is in the snow flake schema.
Select File to Save or click the Save button on the toolbar to save the repository and don`t check the global consistency.


Leave the Administration Tool and the SALES repository open for next modeling.
The Business Model and Mapping layer (known also as Business Model). It represents the logical structure of the information in the repository. The business models contain logical columns arranged in logical tables, logical joins, and dimensional hierarchy definitions. This layer also contains the mappings from the logical columns to the source data in the Physical layer means specifies the mapping between the business models and the Physical layer schemas. It is displayed in the middle pane of the Administration Tool. In this layer physical schemas are simplified and reorganized to form the basis of the users’ view of the data.
To Build the Business Model and Mapping Layer of a Repository Drag and drop the schema from physical layer to Business model and Mapping layer or manually Right click in the white or blank space of the Business Model and Mapping layer below any existing objects and select the New Business Model option. Specify a name for the business model.


After importing you can see your schema in the Business Modeling and mapping layer if you need you can rename the schema.

Check that all the tables were same as Physical layer and specially fact table.
You can create logical tables or columns by dragging physical table objects from the Physical layer into the business model or manually Right-click the business model and select New Object -> Logical Table.
Drag operation is fastest approach for creating logical tables and columns Business Model and Mapping layer .When you drag physical tables from the Physical layer to the Business Model and Mapping layer the columns belonging to the table are also copied with logical keys and joins which are created that mirror the keys and joins in the physical layer and the logical table sources are generated automatically. On the Business Model folder the red symbol indicates that this BM is disabled for querying. Always when you create a new business model, it is disabled for querying automatically by default. When consistency check is done it will available or enable for querying.

You can modify the Logical Tables and Columns in the Business Model and Mapping layer.

Double-click an object (Table/Column) to open the Properties window for the object you can add, delete and reorder columns in the table, add or delete columns, add or delete physical sources, and add or delete primary and foreign keys. Logical column serves as measures.
For delete operation you can directly delete any column or table just select that object which you want to delete and press delete key on the keyboard a message appear on the screen click yes to delete.
You can change the names of business model objects independently from corresponding physical model and its reverse
Defining Measures
Right-click the logical column and select Properties -> Select Aggregation

You can apply measures only on FACT table logical columns.
These are the facts used to evaluate its performance calculations that define measurable quantities.
Default aggregation rules are avilable in the aggregation tab you can choose any one of them from the drop down list to apply measure on the column which you have choosen before.

The columns on which you have applied the aggregation rule appear with the sign summetion/sigma ∑ which indicates that this column is having measures.
The calculations are sent to the database or processed by Oracle BI Server. Measures may not require any calculations. Measures serve as logical column.
Right click on the table sales select Business Model Diagram à Whole Diagram.
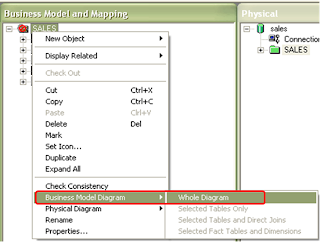
In this layer you can customize the database and tables you can add more tables or delete those tables which are not required for modeling. Here in the SALES schema Region table is merged into STORE table.

So this is the look of Logical Table Diagram for the Business modeling and Mapping layer.


It represents the presentation structure of the repository. This layer allows you to present a view different from the Business Model and Mapping layer to users and exposes only the data meaningful to the users. It is displayed in the left pane of the Administration Tool.

To build the Presentation Layer drag the business model from the BMM Layer to the Presentation layer to automatically create Presentation layer objects. So now you have created a new presentation catalog. Presentation layer objects define the interface that users see to query the data from the data sources. Presentation catalogs in the Presentation layer appear as subject areas in Oracle BI Answers. Presentation tables of Presentation layer appear as folders in Oracle BI Answers and Presentation columns appear as columns in Oracle BI Answers folders.

Expand the SALES catalog in the Presentation layer. Notice that the tables and columns in the Presentation layer exactly match the tables and columns in the Business Model and Mapping layer. Save the repository and do not check global consistency.
.
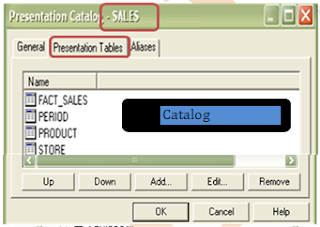
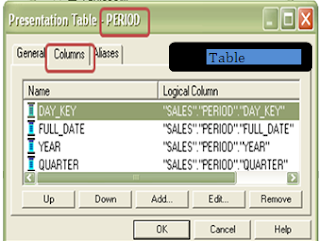
You can rename, delete, rearrange (reorder) both Presentation columns and tables in the Presentation layer using these options Up, Down, Add, Edit and Remove.
To do these operations for Tables Right Click on the Catalog Folder and select properties in the dialog box where you see three tabs General, Presentation Tables and Aliases.
And for columns Right click on columns select properties where you will get General and Aliases is same tab as Catalog but one different tab Columns in place of presentation Tables where you can modify tables.